
[윤성우의 열혈 Java 프로그래밍] Chapter 20 - 자바의 기본 클래스
카테고리: Java lang
태그: java
20-1. 래퍼 클래스 (Wrapper 클래스)
래퍼 클래스는 이름이 의미하듯이 ‘기본 자료형의 값들을 감싸는 클래스’이다.
- 기본 자료형의 값을 감싸는 래퍼 클래스
래퍼 클래스는 기본 자료형의 값을 감싸는 클래스이다.
모든 기본 자료형을 대상으로 래퍼 클래스가 정의되어 있다.
// Boolean
public Boolean(boolean value)

// Character
public Character(char value)

// Byte
public Byte(byte value)

// Short
public Short(short value)

// Integer
public Integer(int value)

// Long
public Integer(long value)

// Float
public Float(float value), public Float(double value)

// Double
public Double(double value)
- 래퍼 클래스의 두 가지 기능
하나는 값을 인스턴스로 감싸는 것이고, 다른 하나는 인스턴스에서 값을 꺼내는 것이다.
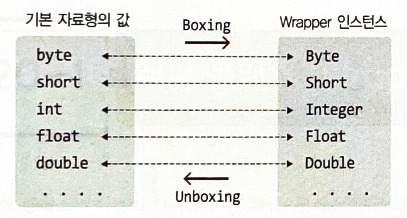
- 박싱(Boxing): 값을 인스턴스에 감싸는 행위
- 언박싱(Unboxing): 저장된 값을 꺼내는 행위
Integer iObj = new Integer(10); // 박싱
Double dObj = new Double(3.14); // 박싱

int num1 = iObj.intValue(); // 언박싱
double num2 = dObj.doubleValue();   // 언박싱
래퍼 인스턴스들은 담고 있는 값을 수정하지 못한다.
따라서 값의 수정이 필요하면 새로운 래퍼 인스턴스를 생성해야 한다.
iObj = new Integer(iObj.intValue() + 10);
dObj = new Double(dObj.doubleValue() + 1.2);
- 오토 박싱(Auto Boxing) & 오토 언박싱(Auto Unboxing)
자바 5부터 박싱과 언박싱이 필요한 상황에서 이를 자동으로 처리하기 시작했다.
이를 오토 박싱, 오토 언박싱이라 한다.
Integer iObj = 10;  // 오토 박싱 진행
Double dObj = 3.14  // 오토 박싱 진행

int num1 = iObj;    // 오토 언박싱
double num2 = dObj; // 오토 언박싱

iObj++; // 오토 박싱, 오토 언박싱 동시 진행
20-2. BigInteger 클래스와 BigDecimal 클래스
- 매우 큰 정수의 표현을 위한 java.math.BigInteger 클래스
일반적인 범위를 넘어서는 매우 큰 수의 표현을 위해 자바는 BigInteger 클래스를 제공한다.
BigInteger big1 = new BigInteger("10000000000000000000000");
BigInteger big2 = new BigInteger("-9999999999999999999999");
그리고 이렇게 표현한 큰 수를 연산하는 다양한 메소드가 정의되어있다.
public BigInteger add(BigInteger val);  // 덧셈
public BigInteger subtract(BigInteger val); // 뺄셈
public BigInteger multiply(BigInteger val); // 곱셈
public BigInteger divide(BigInteger val); // 나눗셈의 몫
public BigInteger remainder(BigInteger val);  // 나눗셈의 나머지
연산을 통해 그 값이 int형 또는 long형으로 표현이 가능한 수준에 이르면 다음 메소드의 호출로 인스턴스에 저장된 값을 얻을 수 있다.
public long longValueExact(); // BigInteger 인스턴스에 저장된 값을 long형 정수로 반환
public int intValueExact(); // BigInteger 인스턴스에 저장된 값을 int형 정수로 반환
- 오차 없는 실수의 표현을 위한 java.math.BigDecimal 클래스
BigDecimal 클래스는 오차 없는 실수의 표현을 위해 제공되는 클래스이다.
// 정상적인 방법
BigDecimal d1 = new BigDecimal("1.6");
BigDecimal d2 = new BigDecimal("0.1");

// 가능은 하지만 오차 발생(실수는 표현되는 순간부터 오차를 지니기 때문)
BigDecimal d1 = new BigDecimal(1.6);
BigDecimal d2 = new BigDecimal(0.1);
BigDecimal 클래스에도 다음 사칙연산을 포함하여 다양한 연산을 위한 메소드가 정의되어 있다.
public BigDecimal add(BigDecimal augend); // 덧셈
public BigDecimal subtract(BigDecimal subtrahend);  // 뺄셈
public BigDecimal multiply(BigDecimal multiplicand);  // 곱셈
public BigDecimal divide(BigDecimal divisor); // 나눗셈
20-3. Math 클래스와 난수의 생성, 그리고 문자열 토큰(Tocken)의 구분
- 수학 관련 다양한 연산의 제공을 위한 Math 클래스
Math 클래스에 정의된 여러 static 메소드에 대해서 알아보자.
public class SimpleMathUse {
public static void main(String[] args) {
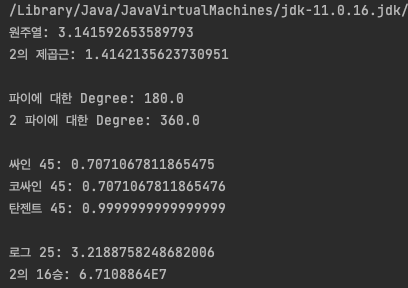
System.out.println("원주열: " + Math.PI);
System.out.println("2의 제곱근: " + Math.sqrt(2));
System.out.println();
System.out.println("파이에 대한 Degree: " + Math.toDegrees(Math.PI));
System.out.println("2 파이에 대한 Degree: " + Math.toDegrees(2 * Math.PI));
System.out.println();
double radian45 = Math.toRadians(45); // 디그리 단위의 값을 라디안 값으로 변환!
System.out.println("싸인 45: " + Math.sin(radian45));
System.out.println("코싸인 45: " + Math.cos(radian45));
System.out.println("탄젠트 45: " + Math.tan(radian45));
System.out.println();
System.out.println("로그 25: " + Math.log(25));
System.out.println("2의 16승: " + Math.pow(2, 26));
}
}
- 난수(Random Number)의 생성
난수는 예측 불가능한 수를 의미한다.
자바에서 난수를 생성하는 방법은 java.util.Random 클래스의 인스턴스를 이용하면 된다.
Random rand = new Random();

// 메소드
public boolean nextBoolean(); // boolean형 난수 반환
public int nextInt(); // int형 난수 반환
public long nextLong(); // long형 난수 반환
public float nextFloat(); // 0.0 이상 1.0 미만의 float형 난수 반환
public double nextDouble(); // 0.0 이상 1.0 미만의 double형 난수 반환
- 씨드(Seed) 기반의 난수 생성
컴퓨터가 난수를 생성하는 것은 일종의 패턴이 있다.
이 값을 씨드 값(Seed Number)라고 하는데, 난수 생성 알고리즘은 이 숫자를 기반으로 돌아가기 때문에 이 값이 같으면 생성되는 난수의 패턴은 100% 일치한다.
import java.util.Random;

public class GanRandom {
    public static void main(String[] args) {
        Random rand = new Random(10);  // seed 값을 전달받음

        for (int i = 0; i < 5; i++) {
            System.out.println(rand.nextInt(1000));
        }
    }
}
사실 씨드 값을 별도로 전달하지 않고 Random 인스턴스를 생성해도 내부에서는 다음과 같은 방식으로 씨드 값을 설정한다.
Random rand = new Random();

public Random() {
  this(System.currentTimeMillis());
}
- 문자열의 토큰(Token) 구분
StringTokenizer 클래스를 이용하면 특정 기준을 가지고 문자열을 작게 나눌 수 있다.
// StringTokenizer 생성자
public StringTokenizer(String str, String delim);

// 반환할 토큰이 남아있나
public boolean hasMoreTokens();

// 다음 토큰을 반환
public String nextToken();
import java.util.StringTokenizer;

public class TokenizeString {
    public static void main(String[] args) {
        StringTokenizer st1 = new StringTokenizer("PM:08:45", ":");
        while (st1.hasMoreTokens()) {
            System.out.print(st1.nextToken() + " ");
        }

        System.out.println();

        // 구분자로 여러 개를 설정할 수 있다.
        StringTokenizer st2 = new StringTokenizer("12 + 36 - 8 / 2 = 44", "+-/= ");
        while (st2.hasMoreTokens()) {
            System.out.print(st2.nextToken() + " ");
        }
    }
}
20-4. Arrays 클래스
java.util.Arrays 클래스는 배열 조작에 도움을 주는 메소드들로 채워져 있다.
이 클래스의 메소드들을 이용해 배열의 복사, 비교, 정렬 및 탐색을 손쉽게 진행해보자.
- 배열의 복사


import java.util.Arrays;
public class CopyOfArrays {
public static void main(String[] args) {
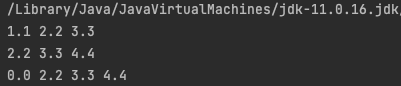
int n = 3;
double[] originArray = {1.1, 2.2, 3.3, 4.4, 5.5};
// copyOf 메소드: 첫 번째 요소부터 n번째 요소까지 배열 복사
double[] copyArray1 = Arrays.copyOf(originArray, n);
// copyOfRange 메소드: 인덱스 번호 from 부터 to 이전 요소까지 복사
double[] copyArray2 = Arrays.copyOfRange(originArray, 1, 4);
// 이미 존재하는 배열에 복사를 하려는 경우
// 배열 org의 인덱스 1에서 배열 copyArray3의 인덱스 1로 n 개의 요소 복사
double[] copyArray3 = new double[4];
System.arraycopy(originArray, 1, copyArray3, 1, n);
for (double i : copyArray1) {
System.out.print(i + " ");
}
System.out.println();
for (double i : copyArray2) {
System.out.print(i + " ");
}
System.out.println();
for (double i : copyArray3) {
System.out.print(i + " ");
}
}
}
- 배열의 비교

위의 메소드는 두 배열에 저장된 데이터의 수, 순서, 그리고 내용이 같을 때 true를 반환한다.(배열의 길이가 다른 경우에도 false를 반환한다.)
public static boolean equals(Object[] a, Object[] a2);
이 메소드는 Object형 배열에 대해서도 오버로딩 되어 있다.
Object 클래스에 정의되어 있는 equals 메소드는 참조 값 비교를 진행한다.
따라서, 배열의 참조 값 비교가 아닌 내용 비교가 목적이라면 다음과 같이 equals 메소드를 목적에 맞게 오버라이딩 해야 한다.
import java.util.Arrays;

class INum {
  private int num;

  public INum(int num) {
    this.num = num;
  }

  @Override
  public boolean equals(Object obj) {
    if (this.num == ((Num)obj).num) { // 두 인스턴스의 내용 비교
      return true;
    } else {
      return false;
    }
  }
}

class ArrayObjEquals {
  public static void main(String[] args) {
    INum[] ar1 = new INum[3];
    INum[] ar2 = new INum[3];

    ar1[0] = new INum(1); ar2[0] = new INum(1);
    ar1[1] = new INum(2); ar2[1] = new INum(2);
    ar1[2] = new INum(3); ar2[2] = new INum(3);

    System.out.println(Arrays.equals(ar1, ar2));  // true
  }
}
- 배열의 정렬

int[] ar = {1, 5, 3, 2, 4};
Arrays.sort(ar);
이 메소드는 다음과 같이 Object 배열에 대해서도 오버로딩 되어 있다.
public static void sort(Object[] a)
인스턴스의 참조 값을 저장하고 있는 배열에 대한 정렬은 무엇을 기준으로 할까?
다음 인터페이스의 구현을 기반으로 프로그래머가 클래스 별로 결정하게 되어 있다.

위 인터페이스에 존재하는 추상 메소드 compareTo의 구현 방법은 다음과 같다.
- 인자로 전달된 o가 작다면 양의 정수 반환
- 인자로 전달된 o가 크다면 음의 정수 반환
- 인자로 전달된 o와 같다면 0을 반환
다음의 예시를 통해 compareTo 메소드를 어떻게 구성하는지 살펴보자.
import java.util.Arrays;
class Person implements Comparable {
private String name;
private int age;
public Person(String name, int age) {
this.name = name;
this.age = age;
}
@Override
public String toString() {
return name + ": " + age;
}
/**
* 나이가 어린 인스턴스의 크기가 작은 것으로 결정한다.
*
* @param o the object to be compared.
* @return
*/
@Override
public int compareTo(Object o) {
Person p = (Person) o;
return this.age - p.age;
// if (this.age > ((Person)o).age) return 1;
// else if (this.age < ((Person)o).age) return -1;
// else return 0;
}
}
public class ArrayObjSort {
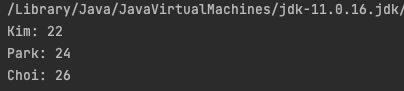
public static void main(String[] args) {
Person[] ar = new Person[3];
ar[0] = new Person("Kim", 22);
ar[1] = new Person("Choi", 26);
ar[2] = new Person("Park", 24);
Arrays.sort(ar);
for (Person p : ar) {
System.out.println(p);
}
}
}
- 배열의 탐색

import java.util.Arrays;

public class ArraySearch {
    public static void main(String[] args) {
        int[] ar = {33, 55, 11, 44, 22};

        Arrays.sort(ar);    // 탐색 이전에 정렬이 선행되어야 한다.

        for (int n : ar) {
            System.out.print(n + " ");
        }
        System.out.println();

        int idx = Arrays.binarySearch(ar, 33);
        System.out.println("Index of 33: " + idx);
    }
}
이진 탐색(Binary Search)라는 알고리즘을 기반으로 탐색을 진행하기 때문에 정렬 과정이 선행되어야한다.
public static int binarySearch(Object[] a, Object key)
마찬가지로 Object형 배열에 대해서도 오버로딩되어있고,
마찬가지로 이 메소드를 사용하기 위해 Comparable 인터페이스를 구현하고 compareTo 메소드를 오버라이딩하면 된다.
import java.util.Arrays;

class Person implements Comparable {
    private String name;
    private int age;

    public Person(String name, int age) {
        this.name = name;
        this.age = age;
    }

    @Override
    public String toString() {
        return name + ": " + age;
    }

    /**
     * 탐색 기준: 이름
     *
     * @param o the object to be compared.
     * @return
     */
    @Override
    public int compareTo(Object o) {
        Person p = (Person) o;
        return this.name.compareTo(p.name);
    }
}

public class ArrayObjSearch {
    public static void main(String[] args) {
        Person[] ar = new Person[3];
        ar[0] = new Person("Kim", 22);
        ar[1] = new Person("Choi", 26);
        ar[2] = new Person("Park", 24);

        Arrays.sort(ar);

        int idx = Arrays.binarySearch(ar, new Person("Choi", 26));
        System.out.println(ar[idx]);  // choi: 26
    }
}

댓글 남기기