[안드로이드 기초] Chapter 04 - 기본 위젯 익히기
카테고리: Android
태그: Kotlin
1. 뷰의 개요
- 뷰와 뷰그룹
- 안드로이드 화면에서 실제로 사용되는 것들은 모두
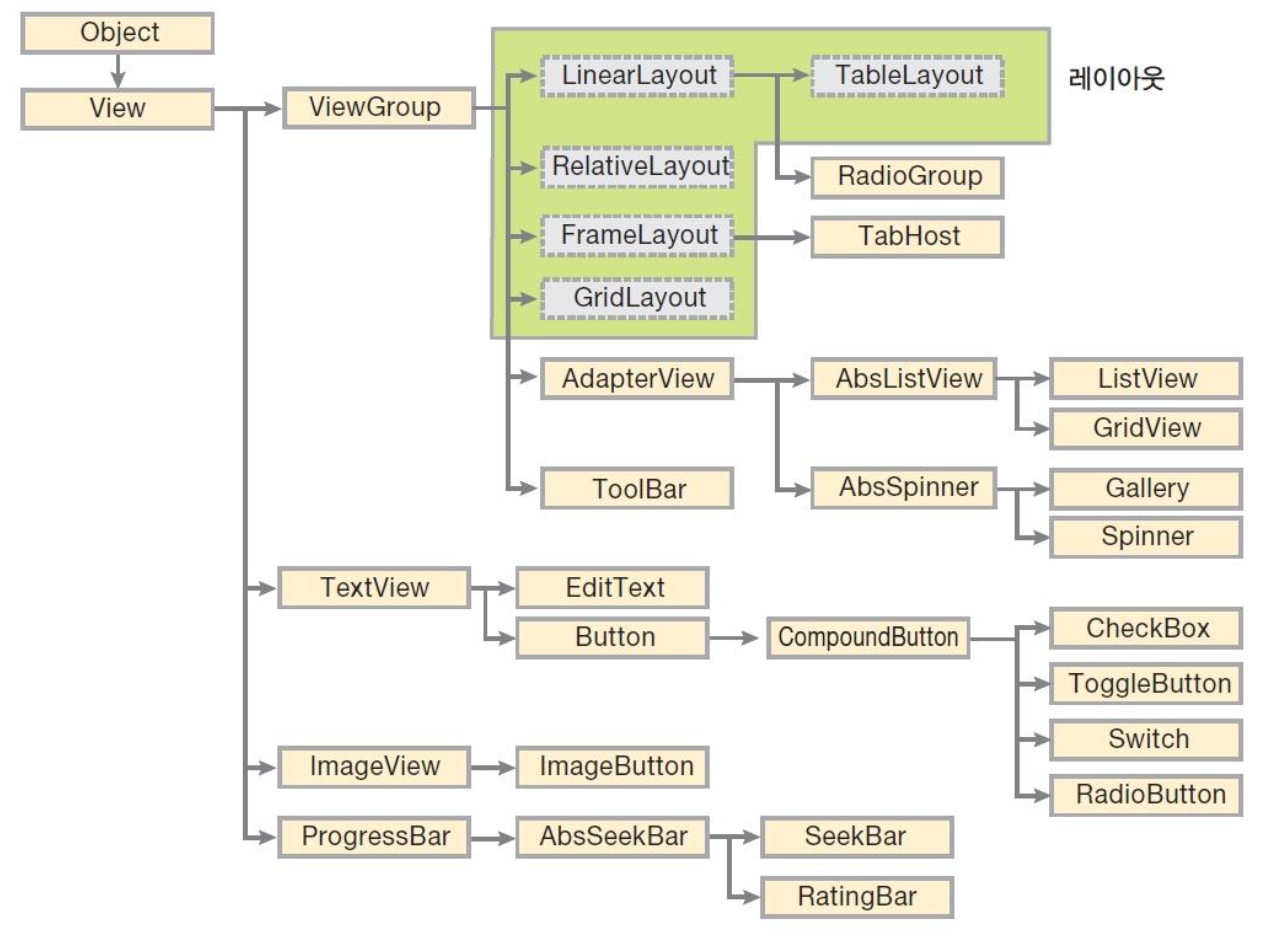
View라는 클래스(‘위젯’이라고도 함)의 상속 받음 버튼,라디오버튼,이미지등등 모두View의서브클래스이다.레이아웃: 다른 위젯을 담을 수 있는 위젯.ViewGroup이라는 클래스 아래에 존재함. 위젯은 단독 존재하지 않고, 위젯을 담아 배치하는 틀이레이아웃이다. (위젯을 포함하는컨테이너역할을 함)
- 안드로이드 화면에서 실제로 사용되는 것들은 모두
- View 클래스의 XML속성
위젯과 레이아웃 모두 View 클래스의 하위 클래스로써 속성과 메소드를 상속받음
하위 클래스들의 속성을 파악해보기 위해, View 클래스나 해당 클래스의 상위 클래스에서 상속받은 XML속성을 알아보자.idlayout_width,layout_heightbackgroundpadding,layout_marginvisibilityenabled,clickable-
rotationid: 모든 위젯의 아이디를 나타냄.Kotlin코드에서 버튼 등의 위젯에 접근할 때id속성에 지정한 아이디를 사용함.android:id = '@+id/btn1' // 버튼 위젯의 아이디로 btn1을 부여한다.Kotlin 코드에서 다음과 같은 형식을 사용한다.
위젯 변수 = findViewById<위젯형>(R.id.위젯id)
layout_width,layout_height: 각각 위젯의 넓이와 높이를 나타냄.math_parent: 자신의 부모에 너비나 높이를 맞춤wrap_content: 글자가 꼭 들어갈 정도로만 자신의 너비나 높이를 설정
android:layout_width = "match_parent"   // "wrap_content"
android:layout_height = "math_parent"   // "wrap_content"

android:layout_width = "1080px"    // 너비 직접 지정
android:layout_height = "1920px"    // 높이 직접 지정
background: 배경색 지정android:background = "#ff0000"
padding: ‘레이아웃의 경계선’과 ‘위젯’ 사이에 여백을 줌

android:padding = "30dp"
layout_margin: ‘위젯’과 ‘위젯’사이에 여백을 줌

android:layout_margin = "30dp"
visibility: 위젯을 보일 것인지 여부. default, invisible, gone 세 가지 상태가 있다.
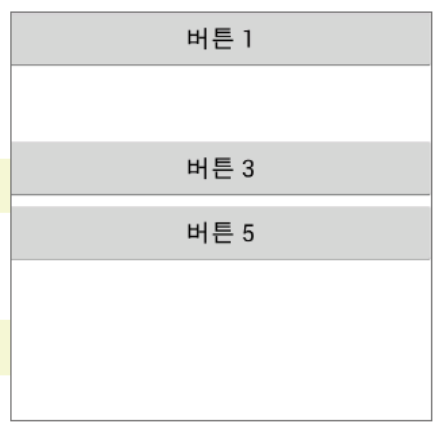
<Button>
    android:text="버튼 1"/>
<Button>
    android:text="버튼 2"
    android:visibility = "invisible"/>
<Button>
    android:text="버튼 3"
    android:visibility = "visible"/>
<Button>
    android:text="버튼 4"
    android:visibility = "gone"/>
<Button>
    android:text="버튼 5"/>
enabled,clickable: 위젯의 동작 여부는enable속성, 클릭이나 터치가 가능하게 하는 것은clickable속성으로 지정한다. 디폴트는 true이다.
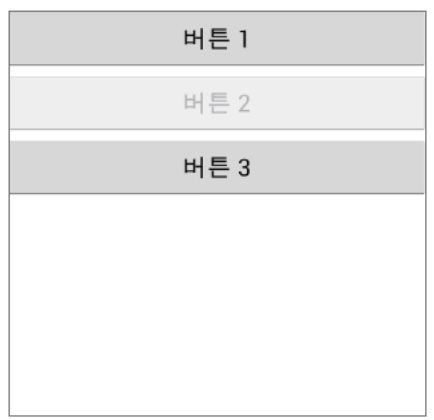
<!-- enable은 버튼이 불투명하게 변함 -->
<Button>
    android:text="버튼 1" />
<Button>
    android:text="버튼 2"
    android:enabled="false" />
<Button>
    android:text="버튼 3"
    android:clickable="false" />
rotation: 위젯을 회전시켜서 출력하고, 값은 각도로 지정함<Button> android:text="버튼 1" /> <Button> android:text="버튼 2" /> <Button> android:text="버튼 3" android:rotation="45" />
2. 텍스트뷰
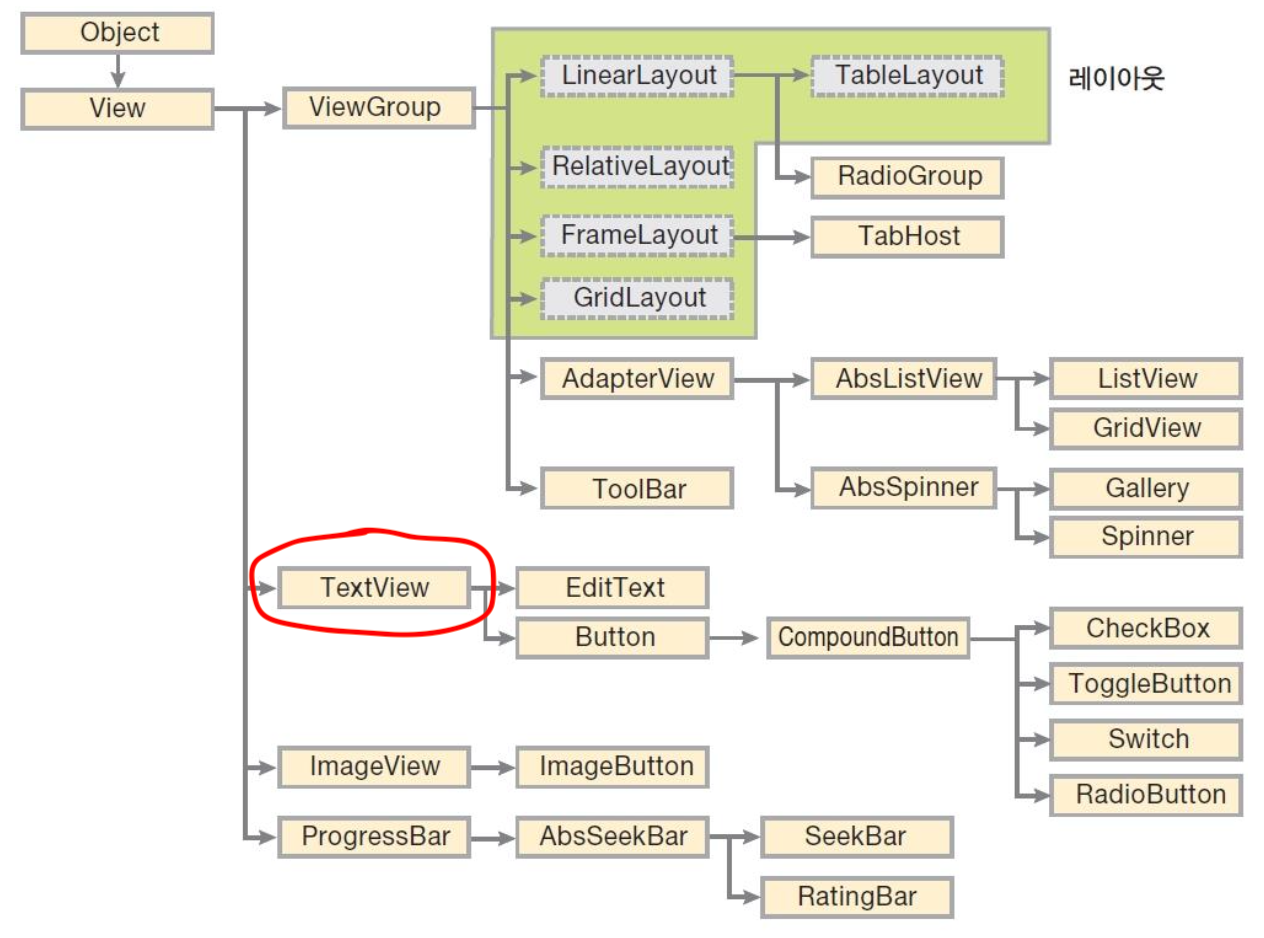
- 텍스트뷰: 텍스트뷰의 속성을 알아봄으로써 그 하위에서 상속받는 다른 위젯들의 속성도 이해해보자.
text: 텍스트뷰에 나타나는 문자열 표현textColor: 글자의 색상 지정textSize: 글자의 크기 지정(dp, px, in, mm, sp 등등)typeface: 글자의 글꼴 지정(sans, serif, monospace 등등)textStyle: 글자의 스타일 지정(bold, italic 등등)-
singleLine: 글이 길어 줄이 넘어갈 경우 강제로 한 줄까지만 출력 후 맨 뒤에 ‘…‘표시(디폴트는 false)<TextView> android:text="textSIze 속성" android:textSize="30dp" android:textColor="#00FF00" android:textStyle="bold|italic" android:typeface="serif" android:singlLine="true" />
-
Kotlin 코드로 XML 속성 설정
xml 파일에서 설정하는 내용의 대부분을 Kotlin 코드에서도 메소드를 이용하여 설정이 가능하다. (보통 setXXX())XML 속성 관련 메소드 비고 background setBackgroundColor() View class clickable setClickable() View class focusable setFocusable() View class id setId() View class longClickable setLongClickable() View class focusable setFocusable() View class padding setPedding() View class rotation setRotation() View class scaleX, scaleY setScaleX(), setScaleY() View class visibility setVisibility() View class gravity setGravity() TextView class inputType setRawInputType() TextView class password setTransformationMethod() TextView class text setTextColor() TextView class textSize setTextSize() TextView class
3. 버튼과 에디트텍스트
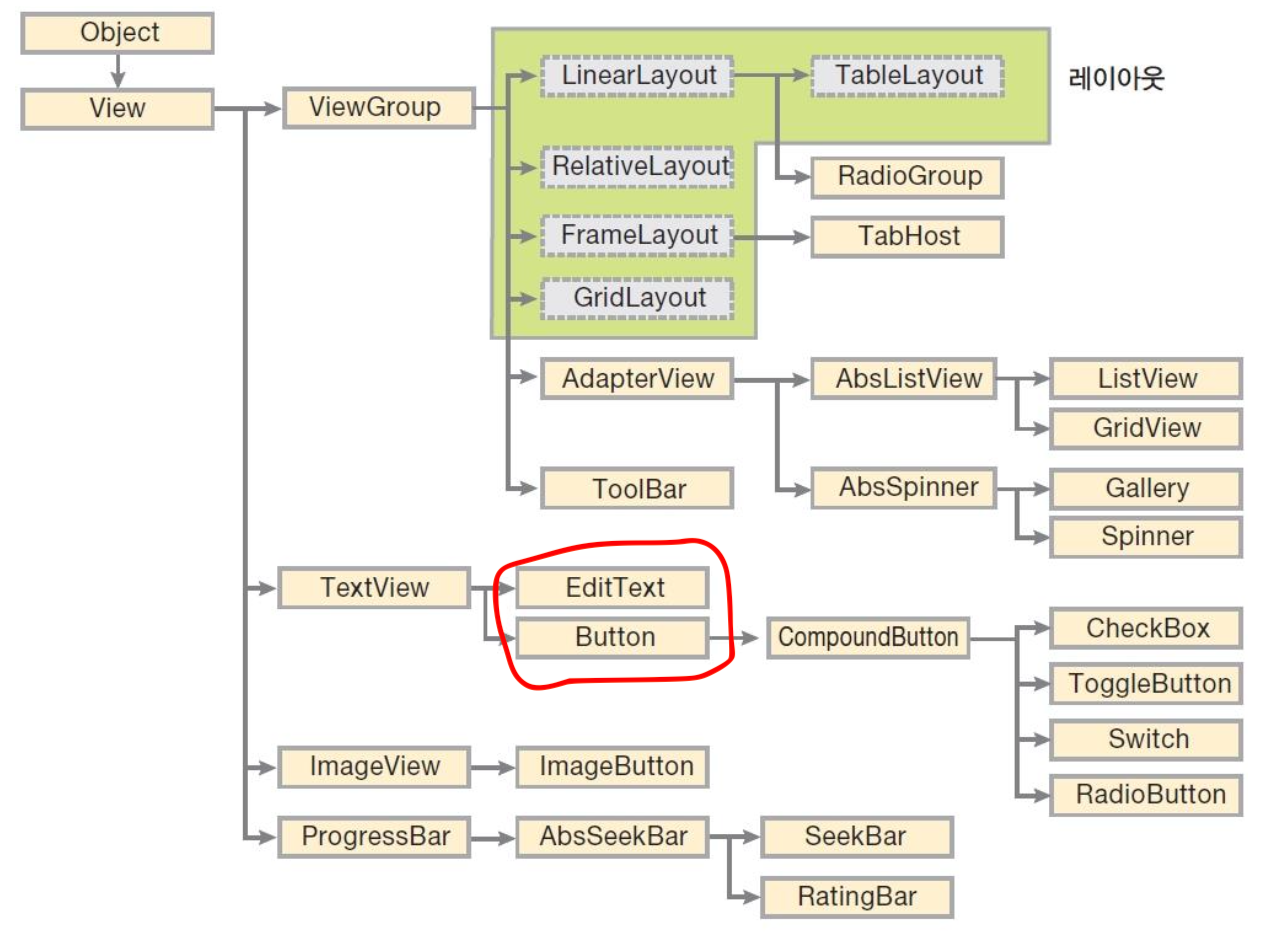
‘버튼’과 ‘에디트텍스트’는 사용자에게서 어떤 값을 입력받기 위한 가장 기본적인 위젯임
버튼의 Kotlin 코드 동작 단계- 버튼 변수 선언
var mybutton : Button - 변수에 버튼 위젯 대입
mybutton = findViewById<Button>(R.id.button1) - 버튼을 클릭할 때 동작하는 람다식 정의
 mybutton.setOnClickListener{
 // 동작 내용을 이 부분에 넣기
 }
- 버튼 변수 선언
에디트텍스트의 Kotlin 코드 동작 단계- 에디트텍스트 변수 선언
var myEdit : EditText - 변수에 에디트텍스트 위젯 대입
myEdit = findViewById<EditText>(R.id.edittext) - 에디트텍스트에 입력된 값 가져오기 -> 주로 버튼 클릭 이벤트 람다식 안에 넣음
 // 에디트텍스트에 입력한 값을 반환하고, 이를 문자열로 바꿔줌
 var myStr : String = myEdit.getText().toString()
- 에디트텍스트 변수 선언
댓글 남기기